• home
    • what we do
    • e-news
    • facebook
    • recipe box
    • instagram
    • food photography
  • gallery
  • about us
  • contact
Menu

Acorn Advisors

  • home
  • our services
    • what we do
    • e-news
    • facebook
    • recipe box
    • instagram
    • food photography
  • gallery
  • about us
  • contact
×

Sheet Pan Chicken Thighs with Brussels Sprouts, Butternut Squash, & Cherries

Lia Soneson September 12, 2019
Sheet_v3_2019_09.jpg
Sheet_v3_2019_10.jpg
Sheet_v3_2019_11.jpg
Sheet_v3_2019_04.jpg
Sheet_v3_2019_07.jpg
Sheet_v3_2019_12.jpg

This recipe just might become a new fall family favorite! With just a few minutes of prep time and a reliable meat thermometer, this recipe is a weeknight dinner winner. We love the sweet and tangy glazed chicken thighs, hearty autumn vegetables, and sweet cherries - what an easy, flavorful combination! Serves 4.

Ingredients:
8 bone-in, skin on chicken thighs
1/4 teaspoon kosher salt
1/4 teaspoon fresh ground pepper
4 cups chopped, peeled butternut squash, cut into 3/4-inch chunks
1 lb Brussels sprouts (about 3 cups), trimmed and halved
2 tablespoons olive oil
1 shallot, diced
1/2 cup dried cherries

Glaze Ingredients:
1/3 cup maple syrup
1/3 cup Dijon mustard
1 tablespoon fresh lemon juice
2 tablespoons olive oil

Directions:
1. Preheat the oven to 450°F with a rack about 6 inches from the top of the oven.
2. Season the chicken thighs with kosher salt and pepper on both sides.
3. In a large bowl, mix the glaze by whisking together the maple syrup, Dijon mustard, lemon juice and olive oil. Brush the chicken with the glaze on both sides.
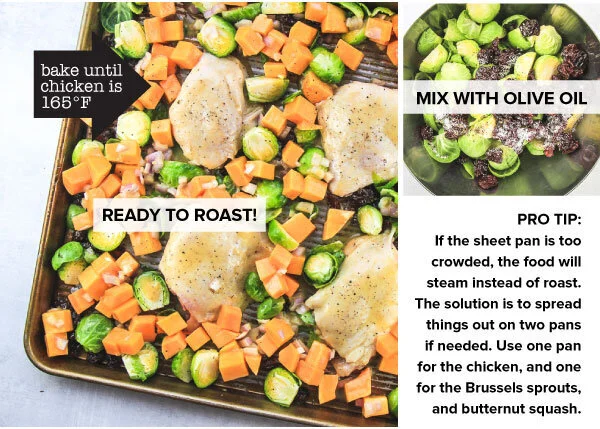
4. Add the butternut squash cubes and shallot to the remaining glaze, and toss to combine. In a separate bowl, mix the Brussels sprouts and dried cherries with 2 more tablespoons of olive oil, kosher salt, and pepper.
5. Spread out all of the prepared vegetables and chicken thighs in a single layer on a large sheet pan. Roast for 25 to 30 minutes, or until the chicken's internal temperature reaches 165 degrees F. If you desire, broil the chicken for an additional 2-3 minutes until a golden crust is formed on the skin. Serve warm.

In Dinner, Sheetpan

Teriyaki Flank Steak with Baby Broccoli, Red Peppers, & Red Onion

Lia Soneson September 12, 2019
Sheet_v3_2019_06b.jpg
Sheet_v3_2019_04.jpg
Sheet_v3_2019_07.jpg
Sheet_v3_2019_12.jpg

This one pan dinner features a delicious teriyaki-marinated flank steak served with a colorful medley of vegetables. This recipe comes together easily with a bit of foresight -- just mix the marinade and marinate the meat the evening before or in the morning for dinner later that day. Serves 4.

Ingredients:
1 flank steak (about 2 pounds)
1 lb baby broccoli
1 red pepper, sliced in strips
1/2 red onion, thinly sliced pole to pole
3 tablespoons olive oil, divided
1/4 teaspoon Kosher salt
1/4 teaspoon fresh cracked pepper

Teriyaki Marinade:
1/4 cup soy sauce
2 tablespoons rice vinegar
2 tablespoons brown sugar
3 tablespoons olive oil
1 tablespoon freshly grated ginger
3 cloves garlic, minced
1/2 teaspoon crushed red pepper

Directions:
1. Mix the marinade ingredients together in a large bowl, place the flank steak in the bowl, cover and refrigerate for 8 hours or overnight.
2. Preheat the oven to 400 degrees F.
3. Toss the baby broccoli in 1 tablespoon olive oil and set aside.
4. Toss the red pepper and red onion in the remaining 2 tablespoons of olive oil and sprinkle with Kosher salt and pepper. Spread in an even layer on a half sheet pan and roast for 5 minutes. Remove from the oven, and move the vegetables to the sides of the pan. Add the marinated flank steak to the middle of the pan.
5. Set the oven to broil. Broil the steak for 5 minutes, then turn the steak over. Add the baby broccoli and broil for another 5-7 minutes. Continue to broil until the steak reaches your desired temperature -- for medium-rare, remove the steak once it reaches 130-135 degrees F.
6. Let the steak rest for 5 minutes before slicing. Serve hot with the roasted vegetables

Creamy, Oven Sun-Dried Tomato Pasta

Lia Soneson August 22, 2019
Tomatoes_2019_v2_16.jpg
Tomatoes_2019_v2_17.jpg
Tomatoes_2019_v2_18.jpg
Tomatoes_2019_v2_19.jpg
Tomatoes_2019_v2_13.jpg

This dish is a great summertime comfort food pasta-style. These homemade, oven “sun-dried” tomatoes have an intense, sweet, and tart flavor that compliments the rich sausage, cheese, and creamy pasta. Traditional sun-dried tomatoes are made using the power of the sun, but we found it was easier to control the many variables by using a low-and-slow oven. The results are delicious! Serves 6-8.

Ingredients:
16 oz penne pasta
1 smoked kielbasa sausage link, thinly sliced
1 tablespoon olive oil
1 small shallot, minced
3 garlic cloves, minced
2 tablespoons butter
6-8 oven "sun-dried" tomatoes, cut into thin slices
2 tablespoons flour
1 cup chicken broth
2 cup half and half
1/4 teaspoon dried oregano
1/4 teaspoon dried basil
1/4 teaspoon crushed red pepper flakes
1/4 teaspoon
Kosher salt
1/4 teaspoon freshly ground black pepper
2 tablespoons chopped fresh basil leaves
1/4 cup freshly shaved
Parmesan cheese

Directions:
1. Cook the pasta in a large pot of boiling water until al dente. Reserve 1 cup of pasta water.
2. In a large sauté pan, cook the sausage until browned on all sides, turning with tongs often. Add a few tablespoons of water, as needed, while cooking to prevent any scorching. Once the sausage has browned, remove the cooked sausage from the pan, and set aside.
3. Add 1 tablespoon of olive oil to the sauté pan and sauté the shallot and garlic for two minutes.
4. Add 2 tablespoons of butter to the pan. Whisk in the flour to form a roux. Add the chicken broth, and half and half and whisk until combined. Season with oregano, basil, crushed red pepper flakes, salt, and pepper. Bring the sauce to a simmer, and cook until the sauce begins to bubble and thicken.
5. Add the cooked pasta, cooked sausage, and sliced sun dried tomatoes to the sauce and stir until pasta is coated with the sauce. Add any reserved pasta sauce, as needed until a silky coating is formed.
6. Garnish with basil and cheese.

In Dinner, Pasta

Blistered Cherry Tomato Caprese Salad

Lia Soneson August 22, 2019
Tomatoes_2019_v2_11.jpg
Tomatoes_2019_v2_12.jpg
Tomatoes_2019_v2_13.jpg

This dish is the perfect way to enjoy smaller varieties such as garden-ripe cherry and grape tomatoes! We’re in the midst of those few rare weeks when there are too many tomatoes and bushels of basil are everywhere. This easy Blistered Caprese Salad is the perfect strategy for enjoying these two garden favorites. Simply blister the tomatoes until they begin to burst, then toss with fresh mozzarella and basil. Garnish with a drizzle of your favorite balsamic vinegar. Serves 4-6.

Ingredients:
1 lb cherry tomatoes
1 tablespoon olive oil
1 tablespoon butter
8 ounces fresh ciliegine or bocconcini mozzarella balls
Basil, chiffonade cut for garnish
Salt and pepper, to taste
Balsamic vinegar

Directions:
1. In a cast iron skillet, heat the olive oil and butter until hot. Add the cherry tomatoes, and sear until the tomato are blistered, and just beginning to crack open.
2. Remove from heat. Toss the blistered tomatoes with the fresh mozzarella balls. Drizzle with balsamic vinegar and garnish with basil, salt and pepper, to taste. Enjoy immediately.

In Salads

Summer Fresh Tomato Jam

Lia Soneson August 22, 2019
Tomatoes_2019_v2_06.jpg
Tomatoes_2019_v2_07.jpg

With basketfuls of tomatoes available, this tomato jam is a delicious and unique way to enjoy the bounty. This recipe features the warm spices of cinnamon, cloves, and ginger that impart a unique depth to the sweetness of the jammy tomatoes. You’ll find it delicious as a dollop on top of goat cheese covered crackers, or as a tasty addition to BLT sandwiches, egg sandwiches. or even on a burger! Makes about 1 pint of jam.

Ingredients:
2 lbs roma tomatoes, cored and chopped
3/4 cup brown sugar Zest of one lemon
2 tablespoons fresh lemon juice
1 tablespoon freshly grated ginger
1/4 teaspoon cayenne
1/4 teaspoon cinnamon
1/8 teaspoon cloves
1/2 teaspoon Kosher salt

Directions:
1. In a large Dutch oven on the stovetop, bring all of the ingredients to a boil over medium heat. Stir the mixture often. Reduce the heat, and simmer for about one hour or until the consistency of the tomatoes is thick, like jam.
2. Cool and refrigerate. Enjoy within one week.

In Jams, Spreads, Condiments

Blueberry & Peach Cobbler

Lia Soneson August 8, 2019
Blueberries_v2_13.jpg
Blueberries_v2_08.jpg
Blueberries_v2_09.jpg

Fresh, ripe blueberries and peaches are truly one of the best parts of summer. The window is short; enjoy both in as many ways as you can! Definitely include this cobbler on your culinary bucket list a couple of times before the season is over. There are many types of cobbler – some cake-like, others with a more biscuit-like character. This time around, we’re featuring a fabulous biscuit-type topping. Slightly sweetened biscuits bake atop a pan of bubbling fruit. The only thing left to do is scoop your favorite vanilla ice cream on top! Serves 4-6.

Filling:
6 peaches, pitted, peeled, sliced
2 cups blueberries, washed and destemmed
1 tablespoon lemon juice, freshly squeezed
1/8 cup white sugar
1/8 cup brown sugar
1 tbsp cornstarch
1/8 teaspoon cinnamon
1/8 teaspoon salt

Topping:
1-2 tablespoons butter, melted
1 tablespoon white sugar
1/8 teaspoon cinnamon

Biscuit Topping:
2 cups all-purpose flour (plus 1/4 cup extra)
1/4 cup white sugar
1 tablespoon baking powder
1 teaspoon Kosher salt
1/2 cup chilled butter, diced into 1/2-inch cubes
3/4 cup milk (plus 2-3 tbsp more)
2 teaspoons vanilla extract

Serve with:
Vanilla ice cream

Directions:
1. Preheat the oven to 425°F. Prepare a ceramic baking dish (about a 2-quart capacity) by lightly buttering the interior.
2. Prepare the filling. Prepare the peaches by peeling, pitting, and slicing into thin, crescent-shaped slices.
3. In a large bowl, add the blueberries to the peach slices. Sprinkle with the white sugar, brown sugar, cornstarch, cinnamon, and salt. Stir until combined.
4. Place the peaches and blueberries in the prepared baking dish and place in the oven for 20 minutes to jumpstart the baking process.
5. Meanwhile, prepare the biscuit topping. In a large mixing bowl, mix together the flour, sugar, baking powder, and salt. Stir to evenly combine the ingredients.
6. Add half of the diced butter to the flour mixture and combine well with a pastry blender or fork. Add the remaining diced butter and continue to blend leaving pea-sized pieces of butter.
7. Add the vanilla extract to the milk. Add the milk mixture to the flour-butter mixture, and stir together until a rough dough is formed. Turn out the dough onto a lightly floured board and gather the dough together. Knead 2-3 times to form a dough ball. Flatten the dough ball to about a 1/2-inch thickness.
8. Using a 2-inch biscuit cutter, cut circles of dough.
9. Place the biscuits on top of the hot fruit in the baking dish. Brush the tops of each dough piece with melted butter. Extra biscuit dough? Simply bake in the oven on a baking sheet until golden brown.
10. In a small bowl, stir together the sugar-cinnamon topping. Sprinkle the mixture on top of the entire dish.
11. Continue baking in a 425°F oven until the biscuit dough is cooked through and the tops nicely golden brown, about 15 more minutes. Remove from the oven and allow to cool for 30 minutes.
12. Serve warm (not hot) with your favorite vanilla ice cream.

In Dessert

Blue Ribbon Blueberry Crisp

Lia Soneson August 8, 2019
Blueberries_v2_06.jpg
Blueberries_v2_07.jpg
Blueberries_v2_08.jpg
Blueberries_v2_09.jpg

Blueberry crisp is one of our favorite, super-easy, summer desserts! The blue-gray berries burst under heat and turn a beautiful deep purple as they release all of their juicy goodness. Because August blueberries are the best, they deserve to shine through by adding the perfect complement. We’ve developed what we think is the perfect crumble topping – one with little chunks that retain their buttery, nutty crispiness. Top each serving of crisp with a little whipped cream, and enjoy each spoonful of summer heaven! Serves 6-8.

Ingredients:
4 cups blueberries, washed and destemmed
1/2 tablespoon lemon juice, freshly squeezed
1/4 cup sugar
1 tablespoon cornstarch
1/8 teaspoon Kosher salt
Butter for greasing the baking dish

Whipped Cream Topping:
1 cup heavy cream
1 teaspoon pure vanilla extract
3 tablespoons powdered sugar

Crumble Topping:
1/4 cup brown sugar, packed
3/4 cup all-purpose flour
1/2 cup rolled oats (old-fashioned)
1/4 cup almonds, coarsely chopped
1/2 teaspoon cinnamon
1/4 teaspoon
Kosher salt 1/4 cup
butter (1/2 stick) melted

Directions:
1. Preheat the oven to 375°F. Butter the interior of a large (3.5 qt.) glass or ceramic baking dish.
2. Prep the blueberries by washing and removing any stems. Drain well, air dry or pat dry.
3. In a small bowl, whisk together the sugar, cornstarch, and salt so that the cornstarch is evenly distributed and without any lumps. In a large mixing bowl, toss the blueberries with sugar-cornstarch mixture. Place in the buttered baking dish.
4. Melt one stick (1/2 cup) butter in a glass-measuring cup using 30 second intervals. In a separate bowl, mix together the brown sugar, almonds, flour, oats, cinnamon and salt. Drizzle the melted butter over the mixture. With your fingertips, work the crumb topping until the butter is evenly distributed and clumps form when pressed together.
5. Sprinkle the crumb topping on top of the blueberry filling. Bake in a 375°F oven for 35-40 minutes. Check progress in 30 minutes; if the top is browning, but the center has not reached an internal temperature of 165°F, loosely tent a piece of aluminum foil over the top, and continue baking for another 15-20 minutes. (Baking times may vary depending on the baking dish, and the depth of the fruit and crumb topping; adjust timing accordingly.)
6. During the final minutes of baking, mix the cream, vanilla, and powdered sugar, in a small, deep bowl, and whip to soft peaks.
7. Serve the crisp while warm topped with a generous dollop of whipped cream or your favorite vanilla ice cream.

In Dessert

Zoodles with Avocado Pesto and Tomatoes

Lia Soneson July 25, 2019
Zucchini_v1_15.jpg
Zucchini_v1_16.jpg
Zucchini_v1_08.jpg
Zucchini_v1_13.jpg

This recipe transforms “zoodles” into a creamy pesto delight. The avocado addition to the pesto adds a smooth richness to the entire dish increasing the level of satisfaction found in each bite. Ripe tomatoes, salty cheese, zesty lemon, and fresh basil complete the dish. This is a perfect, easy weeknight dinner for a warm summer’s day! Serves 2-4.

Avocado Pesto Ingredients:
1 cup of basil
1/4 cup toasted pine nuts
2 cloves fresh garlic
Juice and zest of 1 small lemon (about 2 tablespoons)
1 avocado
4 tablespoons olive oil, divided
1/4 teaspoon kosher salt
1/4 teaspoon pepper
1/4 cup grated parmesan cheese

Zoodle Ingredients:
1 tablespoon olive oil
1/2 teaspoon crushed red pepper
2 zucchini, spiralized into thin zoodles
10 oz cherry tomatoes, halved
Parmesan cheese, shaved as garnish

Directions:
1. Make the pesto by combining the basil, pine nuts, garlic, lemon juice, avocado, and 4 tablespoons olive oil, salt, pepper, and parmesan cheese in a food processor and blend until smooth.
2. In a large sauté pan over medium-high heat, add one tablespoon of olive oil with the crushed red peppers. Add the spiralized zucchini zoodles and sauté until al dente, roughly 2-3 minutes. 
3. Add the pesto to the zoodles and stir until combined. Toss the noodles with the lemon zest, cherry tomatoes, and parmesan. Enjoy immediately.

In Vegetables, Sides

Zucchini Bread & Butter Pickles

Lia Soneson July 25, 2019
Zucchini_v1_06.jpg
Zucchini_v1_07.jpg
Zucchini_v1_08.jpg
Zucchini_v1_13.jpg

These zucchini quick pickles or “zwickles” are a crunchy, sweet, and tangy delight! The key to success for this recipe is using a handheld mandoline for consistently thin slices of zucchini. The brine is punctuated with colorful spices, turmeric and mustard powder, that give the pickles a warm hue and satisfying flavor! Makes about 1 quart.

Ingredients:
2 firm zucchini, sliced 1/8” thick with a mandoline
1/2 white onion, sliced paper-thin with a mandoline
3 tablespoons kosher salt
1 teaspoon celery salt Ice water

Brine Ingredients:
1-1/2 cups apple cider vinegar
1/3 cup white sugar
2 tablespoons whole mustard seeds
1 teaspoon whole black peppercorns
1 tablespoon celery seed
1/2 teaspoon ground mustard powder
1 teaspoon ground turmeric

Directions:
1. Thinly slice the zucchini and onion with a handheld mandoline. In a large bowl, combine the sliced zucchini and onion with the kosher and celery salts. Cover with ice water and stir to dissolve the salt. Soak the vegetables for 1 hour, then drain.
2. Closely pack the zucchini and onions into one or a two clean canning jars.
3. In a medium saucepan, bring the brine ingredients to a boil for 5 minutes. Remove the pickling liquid from heat and slowly pour over the zucchini until about 1/4 inch from the top. 
4. Cover and refrigerate the pickles overnight before serving. 
5. Keep refrigerated. Enjoy the pickles for up to one week.

In Vegetables, Sides

Green Goodness Juice

Lia Soneson July 11, 2019
Beverages2019_v3_23.jpg
Beverages2019_v3_24.jpg
Beverages2019_v3_25.jpg

Looking for a refreshing way to incorporate more fruits and veggies into your day? This not too sweet, not too savory juice is a great way to bust the summer heat. The grapes and apple act as natural sweeteners in this delicious smoothie, while the fresh lemon offers a note of brightness. The mint introduces some additional personality for an overall healthy and satisfying drink. Drink it to start your day, or as an afternoon pick me up! Makes 4 8-oz juices.

Ingredients:
1 green apple, cored
1/2 English cucumber, peeled
1 cup green grapes
1 stalk celery
2 cups spinach leaves
1 lemon, juiced
8 mint leaves

Directions:
1. Combine all of the ingredients in a high-powered blender, and blend on high until all the fruits and vegetables are evenly combined and the juice is smooth. Enjoy immediately.

In Beverages

Wild Berry and Basil Lemonade

Lia Soneson July 11, 2019
Beverages2019_v3_18.jpg
Beverages2019_v3a_19.jpg
Beverages2019_v3_21.jpg

We can’t think of anything more thirst quenching than freshly-squeezed, sweet-tart lemonade. The addition of mixed berries and basil take this classic beverage into new territory as an ultra-refreshing, summer cooler. Makes 5.5 cups.

Ingredients:
1 cup freshly squeezed lemon juice, about
4-6 lemons
1/2 cup raspberries, plus more for garnishing
1/2 cup blackberries, plus more for garnishing
4 cups water
1 cup sugar Lemon slices, for garnishing
Fresh basil, for garnishing

Directions:
1. In a high-powered blender, combine the lemon juice, raspberries, and blackberries until all the ingredients are pureed. Strain the juices through through a fine sieve; discard the seeds.
2. In a pitcher, combine the lemon-berry juice with the water and sugar and stir with a wooden spoon until the sugar dissolves. Fill the pitcher with ice and serve immediately, or store in the refrigerator for up to 3 days. Serve with fresh basil, more berries, and lemon wedges.

In Beverages

Lemon, Ginger, and Mint Sweet Iced Tea

Lia Soneson July 11, 2019
Beverages2019_v3_13.jpg
Beverages2019_v3_14.jpg
Beverages2019_v3_15.jpg
Beverages2019_v3_16.jpg

Nothing says summer like sweet iced tea. We’ve decided to spruce up this southern favorite by adding cool mint and spicy ginger to the lemony tea we love so much. Serve this one with grilled burgers, or complement any al fresco meal. Makes 5 cups.

Ingredients:
5 cups water, divided
8 black tea bags
2 lemons, sliced, plus additional slices for garnishing
1/2 cup sugar
1/2 cup fresh mint leaves, plus additional mint for garnishing
1 tablespoon sliced ginger

Directions:
1. Bring 4 cups of water to a boil. Combine the tea bags and lemon in a large pitcher and pour the hot water over top. Steep for 30 minutes, then remove the tea bags and lemon.
2. While the tea steeps, make a simple syrup by combining one cup water, sugar, mint leaves, and sliced ginger in a small saucepan. Bring the mixture to a boil, stirring until the sugar dissolves and simmer for one minute. Remove from the heat. Steep for 15-20 minutes and strain simple syrup through a fine mesh sieve.
3. Add the simple syrup to the tea, according to your sweetness preference, then refrigerate. Serve on ice with additional lemon wedges and fresh mint leaves.

In Beverages

Honey Vanilla Cold Brew

Lia Soneson July 11, 2019
Beverages2019_v3_08.jpg
Beverages2019_v3_09.jpg
Beverages2019_v3_10.jpg

Sweet and bitter unite! Great flavors shine through in this unique cold brew. Spiked with the sweet addition of a vanilla honey simple syrup, this drink elevates classic cold brew coffee into a new stratosphere of smooth and refreshing. Makes 4 cups strong cold brew

Ingredients:
3 cups distilled water, plus
1 additional cup water
1/2 cup dark roast coffee beans, coarsely ground
1/3 cup honey
2 teaspoons vanilla
1/2 cup half-n-half
Fresh nutmeg, grated

Directions:
1. Place the coarse coffee grounds in the bottom of a French press and combine with 3 cups of filtered water. Stir the water and coffee grounds together to ensure they are incorporated. While the coffee steeps, combine the remaining 1 cup of water, honey, and vanilla in a small saucepan and bring the mixture to a boil until the honey dissolves. Remove from heat and refrigerate.
2. Steep the coffee overnight, around 12 hours. Slowly press the grounds to filter.
3. Evenly distribute the simple syrup into 4 glasses filled with ice. Pour the cold brew concentrate over the simple syrup and stir. Top with half-n-half and fresh nutmeg. Enjoy immediately.

In Beverages

Turmeric Chicken Skewers with Tangy Slaw

Lia Soneson June 20, 2019
Chicken2019_v2_07.jpg
Chicken2019_v2_13.jpg
Chicken2019_v2_14.jpg

Enjoy these colorful chicken kabobs for a healthy meal al fresco! The turmeric in the marinade imbues the chicken with a golden hue and plenty of flavor. Chicken tenders skewer easily, and grill quickly. We paired these tasty chicken skewers with a fresh cabbage slaw that has just a touch of spice. The tangy slaw nicely complements the chicken on the color wheel, on the plate, and on the palate! Makes 6 kabobs.

Ingredients:
12 chicken tenders
Marinade Ingredients:
3 tablespoons olive oil
Juice and zest of
1 lime Juice and zest of
1 lemon
2 cloves garlic, minced
1/2 jalapeño, seeded and finely minced
1 tablespoon dried oregano
1 teaspoon kosher salt
1/2 teaspoon black pepper
1 teaspoon turmeric powder
1/4 teaspoon crushed red pepper flakes
Tangy Slaw Ingredients:
1/2 small red cabbage, thinly sliced with a handheld mandoline
1/4 red onion, thinly sliced with a handheld mandoline
1 cup shredded carrots
Slaw Dressing: (blend together with food processor)
5 green onions
1/2 cup cilantro leaves
2 tablespoons red wine vinegar
1/2 jalapeño, with seeds
2 tablespoons mayonnaise
1/4 cup olive oil salt and pepper
Directions:
1. Whisk the marinade ingredients together in a small bowl.
2. Place the chicken tenders in a large resealable plastic bag. Pour the marinade into the bag, remove the excess air and seal closed. Place the sealed bag into a clean bowl, (just in case it leaks), and refrigerate for 30 minutes - 1 hour.
3. When ready to prepare the chicken, skewer on 2 tenders per metal skewer or soaked wooden skewer. If using wooden skewers soak for at least 30 minutes before skewering and grilling.
4. After the chicken is marinated - fire up the grill! When using a gas grill, prepare half of the grill with high heat while keeping the other half on low heat -- that is, use a direct/indirect set-up. Add the chicken to the cooler side of the well-oiled grill and close the lid. After 4-5 minutes, turn once and cook an additional 4-5 minutes. Continue to grill and flip, as needed, until thickest part of the thigh reaches 160 degrees F. After removing the chicken from the grill, the heat will continue to rise until it hits the food-safe temperature of 165 degrees F.
5. Meanwhile, prepare the tangy slaw. Mix the slaw vegetables with the dressing. Cover and refrigerate for at least 30 minutes to allow flavors to meld.
6. Serve grilled chicken skewers on a bed of tangy slaw.

In Chicken

Piri-Piri Chicken

Lia Soneson June 20, 2019
Chicken2019_v2_07.jpg
Chicken2019_v2_09.jpg
Chicken2019_v2_10.jpg
Chicken2019_v2_11.jpg

Let dinner transport you to Portugal with our adaptation of Piri-Piri chicken! Key to this recipe is a long marination time. Just a bit spicy, this grilled chicken retains it’s juiciness while sporting a nice, crispy skin. Plus, this recipe allows you to brush up on your skills of butterflying a whole chicken (also called spatchcocking). The benefit of the spatchcocking technique is an even thickness for better grilling results. Makes 1 chicken.

Ingredients:
1 (4-5 lb) chicken, spatchcocked to lay flat

Piri-Piri Marinade:
4 cloves garlic
1 small shallot
2 Serrano peppers
1/4 cup fresh parsley
Zest and juice of 1 lemon
2 tablespoon red wine vinegar
1/4 cup olive oil
2 tablespoons sweet paprika
1 teaspoon dried oregano
1 teaspoon kosher salt
1 tablespoon brown sugar

Directions:
1. Prepare the marinade by blending all ingredients together in a small food processor.
2. Spatchcock the whole chicken. With the breast side down, cut on either side of the backbone from tail to neck, and pry apart. Cut the top of the breastbone and loosen the muscles on either side of the breastbone cartilage. Remove the breastbone, (keel bone), and further flatten the chicken open by pressing down.
3. Place the spatchcocked chicken into a bowl and pour the marinade over the chicken. Cover refrigerate, and marinate for at least four hours, or ideally overnight for up to 24 hours.
4. After the chicken has marinated, allow the chicken to warm up for 30 minutes before grilling.
5. Meanwhile, fire up the grill! Heat the grill to a medium-high heat. First, place the chicken on the grill with the breast side down. Close the grill lid, and let cook for 10-15 minutes until a nice char is formed. Then, carefully flip the bird over and grill for another 25-30 minutes. Flip again, and continue to grill until the thickest part of the breast reaches 165 degrees F. Let rest for 10 minutes before serving.

In Dinner, Chicken

Pineapple Teriyaki Chicken Thighs

Lia Soneson June 20, 2019
Chicken2019_v2_06.jpg
Chicken2019_v2_07.jpg

A simple marinade transforms chicken thighs into a succulent, flavorful dinner! These pineapple teriyaki chicken thighs are quick to grill, and pair well with a bowl of rice, fresh pineapple, and a garnish of green onions and sesame seeds. Try this recipe soon -- it just might become the family’s most requested dish this summer. Makes 6 thighs.

Ingredients:
6 boneless, skinless chicken thighs

Pineapple Teriyaki Marinade:
4 cloves garlic
1-inch fresh ginger, finely grated
2 tablespoons brown sugar
1/4 cup pineapple juice
1/2 cup soy sauce

Directions:
1. Mix the marinade ingredients together in a bowl until well combined.
2. Place the chicken thighs in a bowl with a tight lid. Pour the marinade into the bowl, and cover tightly. Refrigerate for at least 1 - 2 hours.
3. After the chicken is marinated - fire up the grill! Reserve the marinade for later (see step 4). When using a gas grill, prepare half of the grill with high heat while keeping the other half on low heat -- that is, use a direct/indirect set-up. Add the chicken to the cooler side of the well-oiled grill and close the lid. After 4-5 minutes, turn once and cook an additional 4-5 minutes. Continue to grill and flip, as needed, until the thickest part of the thigh reaches 160 degrees F. After removing the chicken from the grill, the heat will continue to rise until it hits the food-safe temperature of 165 degrees F.
4. Prepare the marinade for use as a basting sauce. First, it is essential to kill any bacteria. Do this by pouring the marinade into a small saucepan and bring it to a boil. Boil for a minimum of 2 minutes. Brush the cooked juices on the chicken during and after grilling.
5. Make it a meal! Serve the sliced, flavor-infused chicken thighs on a bed of rice. Brush the boiled marinade on top of the grilled chicken. Garnish the bowl with sliced green onions and chunks of fresh pineapple.

In Chicken, Dinner

Flank Steak Summer Salad

Lia Soneson June 6, 2019
Salads2019_v1_11.jpg
Salads2019_v1_12.jpg

This salad is filled with goodness! Featuring flank steak in a salad just may convince meat lovers that a salad can be a satisfying dinner. Flank steak grilled to a perfect medium-rare is thinly sliced, and then served on a bed of summer’s best vegetables. Ripe slices of heirloom tomatoes, peppery arugula, creamy avocado, ribbons of cucumber, fresh basil, and a red wine vinaigrette will elevate your salad game to new heights. Serves 4.

Steak Ingredients:
16 oz flank steak
2 tablespoons olive oil
2 teaspoons Worcestershire sauce
1 teaspoon kosher salt
1 teaspoon pepper

Salad Ingredients:
4 cups arugula
1/2 English cucumber, shaved into ribbons
1 shallot, thinly sliced
2 heirloom tomatoes, sliced into wedges
1 avocado, sliced
Parmesan cheese, shaved
6 fresh basil leaves, chiffonade cut for garnish

Red Wine Vinaigrette:
Makes about 1/3 cup:
3 tablespoons extra virgin olive oil
1 tablespoon red wine vinegar
1 tablespoon shallot, finely minced
1 teaspoon
Dijon mustard Kosher salt
Freshly ground black pepper

Directions:
1. Drizzle the flank steak with the olive oil and Worcestershire sauce on both sides. Sprinkle both sides generously with kosher salt and pepper. Allow the steak to come to room temperature for about 30 minutes before grilling.
2. Grill the steak! Fire up the grill, preheat to high. Place the steak on the grill, and cook for 5 minutes, flip once, and cook for another 5 minutes. Continue grilling and flipping until the internal temperature reaches 135 degrees F for medium-rare. Remove the steak from the grill, and let it rest for 10 minutes. Cut the steak into strips against the grain.
3. Prepare the tomatoes, cucumber, avocado, shallot, and Parmesan cheese.
4. Make the vinaigrette by whisking all ingredients together until well-combined.
5. Mix the salad together in a large bowl by adding the arugula, cucumber ribbons, and shallot together, and tossing with the vinaigrette. Divide into bowls or plates, and top with the grilled steak, tomato slices, avocado, and Parmesan cheese shavings. Garnish with ribbons of fresh basil.

In Salad, Entree, Beef

Grilled Harvest Salad

Lia Soneson June 6, 2019

Celebrate the smoky, charred flavors of grilled vegetables by pairing them with fresh, leafy spinach and ripe grape tomatoes. Grilled corn, red pepper, and fresh mint give both sweetness and brightness to this salad. Earthy zucchini and summer squash pair well with the tangy feta to ensure fullness and a blissful salad experience with each bite. Serves about 4.

Salad Ingredients:
2 ears corn
1 red pepper
1 zucchini, cut into
1/2” thick slices
1 summer squash, cut into
1/2” thick slices
3 tablespoons of olive oil for grilling vegetables
Kosher salt and pepper to sprinkle on grilled vegetables
8 ounces spinach leaves, stems removed
1/2 red onion, thinly sliced
8 ounces grape tomatoes, halved
4 oz. feta cheese, crumbled
6 fresh mint leaves, chiffonade cut for garnish

Lemon Vinaigrette:
Makes about 1/4 cup:
3 tablespoons extra virgin olive oil
1 tablespoon red wine vinegar
2 tablespoon fresh squeezed lemon juice
1 teaspoon honey
1/8 teaspoon kosher salt
1/8 teaspoon freshly ground black pepper
1/4 teaspoon oregano
1/4 teaspoon dried mint

Directions:
1. Grill the vegetables: Prepare the corn by removing the stalks and silk. Brush with olive oil and sprinkle with kosher salt and pepper. Grill over direct heat for 15-20 minutes, turning often until the corn turns a bright yellow, with some char marks. Cut the red pepper in half, remove inner seeds and ribs, and then brush with olive oil and sprinkle with kosher salt and pepper. Grill over direct heat for 2-4 minutes per side. Cut the zucchini and summer squash into 1/2’ thick slices, brush with olive oil and sprinkle with kosher salt and pepper, and grill over direct heat for 3-4 minutes per side.
2. Whisk together the vinaigrette until well-combined.
3. Toss the spinach, red onion, and grape tomatoes with the vinaigrette until well-coated. Divide into bowls or plates and top with the grilled vegetables and crumbled feta cheese. Garnish with the fresh mint chiffonade.

In Salads, Entree

Nectarine, Raspberry & Grilled Chicken Salad

Lia Soneson June 6, 2019
Salads2019_v1_05.jpg
Salads2019_v1_06.jpg
Salads2019_v1_07.jpg
Salads2019_v1_12.jpg

Both savory and sweet - this balanced salad celebrates fresh summer fruits and crisp greens. The nectarine-poppyseed vinaigrette, fresh raspberries, and sliced nectarines add color and a touch of sweetness to the heartier elements of grilled chicken, almond slices, and goat cheese. This salad is a true delight! Serves 2-4.

Ingredients:

Grilled Chicken:
2 chicken breasts, boneless and skinless
2 tablespoon olive oil
1 tablespoon fresh lemon juice
1 teaspoon kosher salt
1/2 teaspoon pepper
1/4 teaspoon paprika
1/4 teaspoon oregano

Salad Ingredients:
4 cups baby spring greens mix
3 scallions, sliced
1 nectarine, sliced
6 ounces raspberries
3 tablespoons sliced almond
4 ounces fresh goat cheese, crumbled

Nectarine-Poppyseed Vinaigrette:
Makes about 1/2 cup:
3 tablespoons extra virgin olive oil
1 tablespoon champagne vinegar
1 nectarine
2 tablespoon fresh lemon juice
1 teaspoon poppy seeds
1 tablespoon honey
1/8 teaspoon kosher salt
1/8 teaspoon freshly ground black pepper

Directions:
1. Place the chicken breasts in a bowl and drizzle with the olive oil and lemon juice. Sprinkle with salt, pepper, paprika and oregano on both sides. Let the chicken marinate for 30 minutes.
2. Fire up the grill! When using a gas grill, prepare half of the grill with high heat while keeping the other half on low heat -- that is, use a direct/indirect set-up. Add the chicken to the cooler side of the well-oiled grill and close the lid. After 4-5 minutes, turn once and cook an additional 4-5 minutes. Continue to grill and flip, as needed, until the thickest part of the breast reaches 160 degrees F. After removing the chicken from the grill, the heat in the chicken breast will continue to rise until it hits the food-safe temperature of 165 degrees F. Let the chicken rest for 5 minutes, then cut into slices.
3. Prepare the vinaigrette by blending all ingredients together in a small food processor unti well-combined.
4. Assemble the salad by gently tossing the spring greens mix and sliced green onions with the vinaigrette. Place in individual bowls or plates, and top with the nectarine slices, grilled chicken slices, raspberries, almond slices, and goat cheese. Serve and enjoy.

In Salad, Entree

BBQ Burger with Crispy Onions

Lia Soneson May 23, 2019
Burgers_v2_2019_04.jpg
Burgers_v2_2019_05.jpg
Burgers_v2_2019_06.jpg
Burgers_v2_2019_08.jpg
Burgers_v2_2019_09.jpg
Burgers_v2_2019_12.jpg

This BBQ Burger is a true indulgence! It is loaded with some of our favorite toppings - BBQ sauce, crispy bacon, creamy avocado, cheddar cheese, and crispy battered onions. The crispy onions are easy to prepare and are so amazingly delicious, it is hard to refrain from eating them on their own. Makes 4 burgers.

Burger Ingredients:
1-1/2 lb 80/20 ground beef
1 teaspoon kosher salt
1/2 teaspoon pepper
1/4 cup barbecue sauce

Toppings:
4 slices cheddar cheese
4 hamburger buns
4 slices bacon, cooked and cut in half
Crispy onions (see recipe)

Crispy Onion Ingredients:
1/2 onion, thinly sliced with a mandoline
1 cup buttermilk
1/2 cup flour
1/4 teaspoon kosher salt
1/4 teaspoon paprika
1/4 teaspoon garlic powder
1/4 teaspoon cayenne
1/2 cup canola oil, for frying

Directions:
1. In a large bowl, mix the ground beef with the salt, pepper, and barbecue sauce. Divide the mixture into four equal portions, and then shape into 4 burger patties each about 4 inches in diameter.
2. Prepare the crispy onions. Thinly slice the onion with a handheld mandoline or a sharp knife. Soak the onion slices in the buttermilk for about 10 minutes. In a small bowl, mix together the flour, kosher salt, paprika, garlic powder, and cayenne. Dredge the soaked onion slices in the flour mixture. Fry the onion slices in 1/2” of oil heated to 350°F until crispy -- about 30 seconds per side. Drain the onion slices on a paper towel-lined plate until ready to assemble the burgers.
3. Prepare the bacon by frying until crispy. Drain the bacon strips on a paper towel-lined plate until ready to assemble the burgers.
4. Grill the burgers on a medium-hot, well-oiled grill, or on a cast iron griddle for 4 minutes per side until the internal temperature reaches 160 degrees F. Avoid pressing the burgers down with the spatula forcing out the meat’s juices.
5. Once the burger has cooked, add a slice of cheddar cheese to each burger, and let melt. Place the cooked burgers on a clean plate and let rest them for five minutes.
6. While the burgers are resting, grill their buns until just lightly toasted.
7. Assemble the burgers. Place a grilled patty on the toasted bun. Layer on a slice of bacon, BBQ sauce, and a pile of crispy onions. Top with the other half of the bun. Serve while hot.

← NewerOlder →
START WORKING WITH US TODAY!

(319) 830-9103 | © 2025 ACORN ADVISORS MARKETING