Make Your Own Summer Blueberry Hand Pies


SUMMER BLUEBERRIES burst with a flavor that only happens when truly in season. One of our favorite ways to celebrate these little nutritional powerhouses is to place them in hand pies. The berries’ diminutive size fit neatly into petite packets, which highlight the rich cream cheese-based crust — a truly mouth-watering match!

Summertime Blueberry Hand Pies
Makes 6 - 8 hand pies

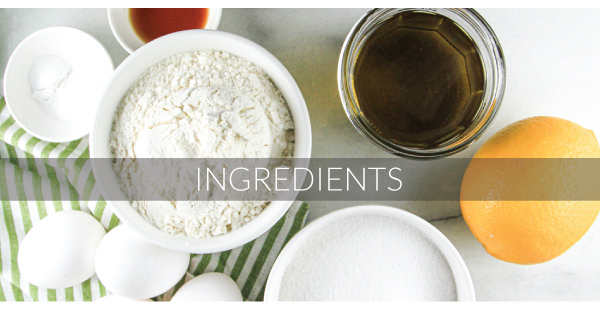
Cream Cheese Crust Ingredients:
2 cups all-purpose flour
1 teaspoon sugar
1-1/4 teaspoon Kosher salt
8 oz. (1 pkg) cream cheese
1 cup unsalted butter (2 sticks), well chilled

Crust Assembly Ingredients:
2 egg whites, beaten
1 tablespoon coarse sugar for crust topping

Blueberry Filling:
2 cups blueberries
3 tablespoons sugar
1 tablespoon cornstarch

Directions:

1. PLACE the flour, sugar, and salt in
the bowl of the food processor. PULSE a few times to evenly distribute the sugar and salt.
2. CUT the butter and cream cheese into 1/2-inch cubes. Use a little of the flour mixture to keep the pieces from sticking together. CHILL the cut butter and cream cheese cubes for 15 minutes.
3. PLACE the butter and cream cheese cubes in the food processor with the flour mixture. PULSE 6-8 times to cut the butter and cream cheese into the flour. The dough mixture will be coarse with some pea-sized pieces of butter and cream cheese remaining. (Resist the urge to keep pulsing.)
4. REMOVE the rough dough from the work bowl and form into a ball using your hands and a light touch.
5. FLATTEN the dough ball into a disk about a half-inch thick, and wrap in plastic wrap.
6. CHILL the wrapped dough disk for an hour or overnight.
7. REMOVE the dough from the refrigerator when ready to bake the hand pies and let set for 10 minutes on the countertop while the filling is mixed.
8. STIR the cornstarch and sugar together, then sprinkle over the fresh blueberries. Gently toss the fruit to distribute the cornstarch/sugar mixture. Set aside while finishing crust preparation.
9. ROLL the dough on a lightly floured surface to a 1/8- to 3/16-inch thickness.
10. CUT circles from the dough (5-inch circles for 6 pies; 4-inch circles for 8 pies). TRANSFER half of the circles to a baking sheet lined with parchment paper.
11. BEAT the egg whites with 2 teaspoons of water, and BRUSH the egg white wash lightly on the edge of each circle.
12. SPOON the prepared blueberries into the center of each bottom circle mounding them slightly. Leave about 1/2-inch of the crust clear for sealing.
13. STRETCH the top circles slightly to fit over the mounded blueberries. MATCH the edges of the top crust with the bottom crust pressing them together. CRIMP the edges with fork tines.
14. BRUSH the formed hand pies with the egg white wash. SPRINKLE lightly with sugar if desired. VENT the pies by cutting small slits on the top with the tip of a paring knife in a decorative design of your choosing. (We like a simple star with five small cuts placed in a radiating pattern.)
15. BAKE the hand pies in a 400° oven for 15-20 minutes, or until the crust is golden brown.
16. SERVE warm or cooled to room temperature.


Cream Puffs with Berries

Cream Puffs with Berry Filling

Expanding your repertoire of kitchen skills these days? Add cream puffs to your list of culinary mastery while celebrating the return of fresh berries. The light, delicate, cream puffs with sweet berry filling are perfect for Mother’s Day, too! This recipe starts with a classic French pâte à choux and finishes things off with bright, jammy berries, and homemade whipped cream.

Cream Puffs with Berry Filling

Cream Puffs with Sweet Berry Cream Filling
Makes 24 petite cream puffs

Cream Puff Shell Ingredients:
1/2 cup water
1/2 cup milk
8 tablespoons (1 stick) unsalted butter
1/2 teaspoon sugar
1 teaspoon salt
1-1/4 cups all purpose flour
6 eggs

Berry Filling Dressing:
1 package (10 oz) raspberries, fresh or frozen 1/4 cup reserved
1 package (10 oz) package blackberries, fresh or frozen, 1/4 cup reserved
3 tablespoons granulated sugar
3 cups heavy cream
1/2 teaspoon vanilla extract
1/2 cup confectioners sugar, plus more for dusting

1. Preheat the oven to 425°F. Prepare two baking sheets by lining them with parchment paper or silicone baking mats.

2. In a 3 quart saucier pan, bring the water, milk, and butter to a boil. Add the salt and sugar and stir until dissolved.

3. Remove the pan from heat and in one motion add the flour. Stir the mixture vigorously until combined. Return to the burner and continue to stir until the mixture stays away from the sides of the pan. Cool the dough until it’s just warm to the touch, or measures about 130°F.

4. Move the forming dough into the bowl of a stand mixer. Using the paddle attachment, add five of the eggs, one at a time, (reserving the sixth for an egg wash to be applied just prior to baking). Incorporate each egg before adding the next. Continue beating after the last egg for a couple of minutes or until smooth.

5. Transfer the dough to a piping bag with a 1/2” plain tip. Pipe 2” diameter mounds onto the lined baking sheets, twelve petit puffs on each sheet. (Or use a spoon to place dollops.) Whisk the final egg with a couple teaspoons of water to make an egg wash. Brush the egg wash over the top and sides of the dough mounds.

6. Bake in the preheated oven for 10 minutes, then reduce heat to 350°F and continue baking for another 15 minutes. The pastries should be evenly golden brown.

7. Immediately after removing from the oven, cut the tops off the puffs with a serrated knife to allow steam to escape. This will assist greatly in the puffs retaining their shape. Set aside to cool.

Filling Directions:

8. In a medium saucepan over medium heat, combine the raspberries, blackberries, and granulated sugar. Stir and simmer for 15-20 minutes, stirring occasionally, until the berries have broken down and begin to thicken. Turn the heat to low and simmer for an additional 15 minutes. Remove from heat and cool.

9. In a stand mixer with a chilled bowl, whip the cream, vanilla, and sugar until stiff peaks form. Transfer the whipped cream into a pastry bag with a star tip.

10. Stir reserved berries into cooled berry filling.

11. Assemble the cream puffs by spooning 1-2 tablespoons of the berry filling in the cream puff base. Add a dollop of whipped cream on top. Finish by covering with the pastry top shell. Sprinkle with powdered sugar and serve.

Carrot Cake Cupcakes

Carrot Cake Cupcakes

Treat yourrself to these flavorful carrot cake cupcakes topped with a decadent cream cheese frosting. The cupcake is moist and filled with comforting spices. The shredded carrots and hint of orange zest lend a sweet flavor while the walnuts add depth. These cupcakes assemble easily and are guaranteed to make the day just a little better!

Carrot Cake Cupcakes

Carrot Cake Cupcakes
Makes 12 cupcakes

Cupcakes Ingredients:
1-1/2 cups finely shredded carrots (about 3-4 smaller carrots)
1 cup all purpose flour
1 teaspoon baking soda
1/2 teaspoon baking powder
1/2 teaspoon salt
1 teaspoon ground cinnamon
1/4 teaspoon ground ginger
1/4 teaspoon ground nutmeg
1/2 cup vegetable oil
1/2 cup granulated sugar
1/4 cup brown sugar, packed
1/4 cup unsweetened applesauce
1 tablespoon orange zest
1/2 teaspoon vanilla extract
2 eggs, beaten
1/2 cup chopped walnuts

Cream Cheese Frosting:
1 (8 oz) package cream cheese frosting, room temperature
4 tablespoons butter, room temperature
1 teaspoon vanilla extract
2 cups powdered sugar
1/4 teaspoon salt

Directions:
1. Preheat the oven to 350 degrees F.
2. Prepare a standard 12-count cupcake pan by filling with cupcake liners.
3. Finely grate the carrots using a food processor or a handheld grater. If using a food processor, grate the carrots and then pulse a few more times to make an extra fine texture. Don’t over pulse, as the carrots could turn into juice!
4. In a mixing bowl, mix together the flour, baking soda, baking powder, salt, cinnamon, ginger, and nutmeg.
5. In a separate mixing bowl, whisk together the eggs with the sugar, brown sugar, applesauce, orange zest, vanilla extract, and oil. Whisk until fully combined and fluffffy. Add in the grated carrots.
6. Combine the dry ingredients with the wet ingredients and mix until just combined. Don’t over mix; this will create too dense of cupcakes. Gently stir in the chopped nuts.
7. Using a measuring cup, fill each cupcake liner 3/4 full of batter.
8. Bake for 16-20 minutes or until a wooden toothpick pierced in the center comes out clean.
9. Cool the cupcakes in the pan for 5 minutes, then carefully transfer the cupcakes to a wire cooling rack to completely cool before frosting.
10. While the cupcakes are baking, prepare the frosting. Using a stand mixer or hand mixer, cream the room temperature cream cheese and butter together for about 2-3 minutes until it’s very smooth.
11. Add in the vanilla extract, salt, and powdered sugar. Continue mixing until the frosting is fluffffy and reaches the desired texture for piping. For a stiffffer frosting, continue adding powdered sugar in 2 tablespoon increments until the desired consistency is reached.
12. Pipe the cooled cupcakes with frosting using your favorite decorating tips. We used two difffferent decorating tips: 1m & 22 to create various patterns.
13. Store the cupcakes in an airtight container and enjoy within 4 days.